Selvedge Bracelet Tutorial
- Banjoflannel
- Aug 27, 2025
- 5 min read

Clear your sewing table and some ME time, we're making selvedge bracelets!
Look, I don't know why we haven't done this before...but it's the perfect way to wear your sewing heart on your sleeve (wrist). They are so easy to make, you're going to want one for every day of the week! It's also just as pretty to wear with the reverse side out, the velcro tab will just be visible.

This is actually 2 tutorials in one. I started making these with a "tube-turning" method, then tried it with a "fold & press" method. I am now firmly on Team "Fold & Press"! The results look much cleaner, right angles are sharper and the lines are
straighter. But, I decided to include both methods because some people dislike precise folding and pressing, and others may dislike turning small tubes RS out. We all have our pain points!
The Tube-Turning Method is first, then the Fold & Press Method. The first section of instructions is common to both methods, then it splits into each method. Finished size is 1 1/2'' x 7 1/2'' with a 1'' x 1'' Velcro tab. All seams are 1/4'' and topstitching is 1/8'' from edge.
✨Share your make with the hashtag #selvedgebracelet
and tag me @banjoflannel ✨
Fabric & Supplies
Minimum 2'' x 8'' strip of your favorite quilting cotton selvedge for bracelet front
Minimum 4'' x 8'' piece of a coordinating quilting cotton for bracelet back and Velcro tab (Suggestions: same fabric print as the selvedge or a different print from the same collection)
Minimum 4'' x 10'' piece of Pellon SF101
1'' long piece of 5/8'' hook & loop closure (Velcro)
Basic sewing supplies: straight pins, fabric marking pen/pencil, quilting ruler, rotary cutter & mat or fabric scissors, iron & ironing board, coordinating thread for top and bobbin, sewing machine
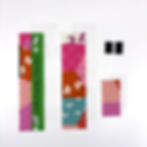
Fabric Cuts (see photos below for more instruction):
2'' x 8'' rectangle of selvedge edge fabric for bracelet front
2'' x 8'' rectangle from coordinating quilting cotton for bracelet back
1 1/2'' x 3'' rectangle from coordinating quilting cotton for Velcro tab
Two 2'' x 8'' rectangles from Pellon SF101 for bracelet front and back
1 1/2'' x 3'' rectangle from Pellon SF101 for Velcro tab


Align a clear quilter's ruler next to the selvedge edge to position the bracelet front exactly how you want it to look (8'' long). Mark the 2 ends of the bracelet front and cut. Trim the width to 2''. I like to trim off the fuzzy selvedge edge first. Repeat for the bracelet back.

Preparation:
Fuse 2'' x 8'' rectangle of SF101 to WS of bracelet front
Fuse 2'' x 8'' rectangle of SF101 to WS of bracelet back
Fuse 1 1/2'' x 3'' rectangle of SF101 to WS of Velcro tab
Attach the Velcro


Fold the Velcro tab in half WS together and finger crease. Unfold tab and align the loop half of the Velcro piece 1/8'' away from the fold. Sew all 4 edges to secure.
Draw a line 1/4'' away from the end of one short edge of the bracelet back. Position the hook half of the Velcro 1/16'' away from the line, centered. Sew all 4 edges to secure.


Tube-Turn Method


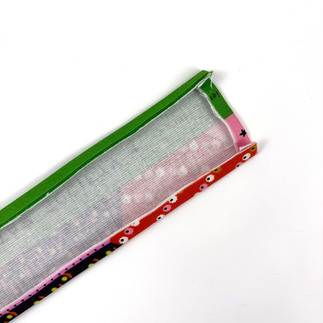
Sandwich bracelet front and back RS together and pin.
Sew around the bracelet leaving the end opposite the velcro open. Make diagonal cuts at the corners.
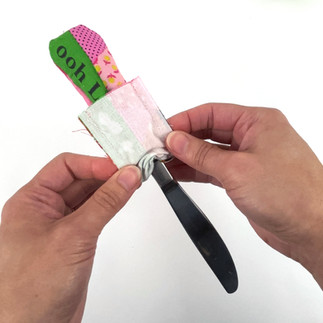
Close to the velcro end of the bracelet, pinch the fabric and pull apart (like you're opening a potato chip bag). Create a fold around the bracelet and fold it down. Place the bottom end of a butter knife (or other long narrow tool) inside the fold you just made.
Start pulling the bracelet fabric down over the butter knife just above the fold. It will be slow going at first, but will get easier. Keep pulling the fabric down until the entire bracelet is RS out.
Push out the corners and press. Press open the seams of the open end, then fold and press the end to the inside by 1/4''.
Fold the Velcro tab RS together and sew the sides, leaving the end open. Make diagonal cuts at the corners.
Here's the part that may make you judge my sanity. I'm sure there's lots of reasonable ways to turn this piece RS out. I use a pair of needle nose pliers! If you do this, be VERY CAREFUL of the part of the pliers that is used to cut wires...it will also cut YOU. Push the corners out and press.
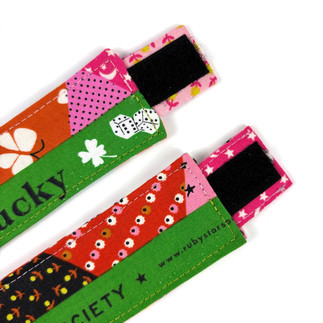
Insert the Velcro tab into the open end of the bracelet. Velcro side of the tab facing same direction as the bracelet front. Adjust Velcro tab so that 1'' is protruding from the bracelet opening.
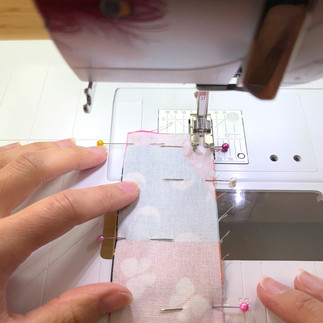
Sew around all 4 sides of the bracelet. I typically start in the center of the open end. Use a height compensation tool to help with sewing past the thick corners. After turning a corner, raise the presser foot, place the height compensation tool behind the bracelet and under the presser foot (see 3rd photo above). Lower the presser foot and sew as normal. The tool will keep the presser foot level which helps it start sewing through the thick corner.
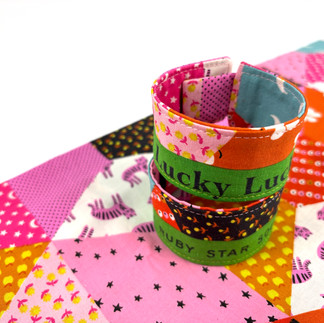
Enjoy your new Reversible Selvedge Bracelet!


Fold & Press Method
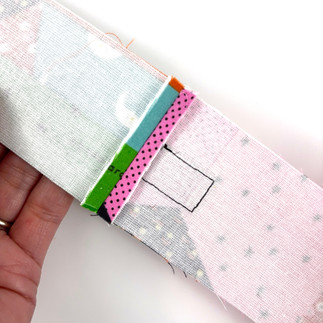
Sandwich bracelet front and back RS together. Pin the Velcro end and sew the edge. Open the bracelet flat and press the seam open.
Press the opposite short ends to the WS by 1/4'', then press the 2 long edges as well.
Fold the bracelet in half WS together, align all folded edges and pin.
Press the long edges of the Velcro tab 1/4'' to the WS. Fold tab in half WS together and topstitch 2 long edges together, leaving the short end open.
Insert the Velcro tab into the open end of the bracelet. Velcro side of the tab facing same direction as the bracelet front. Adjust Velcro tab so that 1'' is protruding from the bracelet opening.
Sew around all 4 sides of the bracelet. I typically start in the center of the open end. Utilize a height compensation tool to help with sewing past the thick corners. After turning a corner, raise the presser foot, place the height compensation tool behind the bracelet and under the presser foot (see 3rd photo above). Lower the presser foot and sew as normal. The tool will keep the presser foot level which helps it start sewing through the thick corner.
NOTE: Use a stiletto to help force the folded edges to align (see first 2 photos above).
Enjoy your new Reversible Selvedge Bracelet!


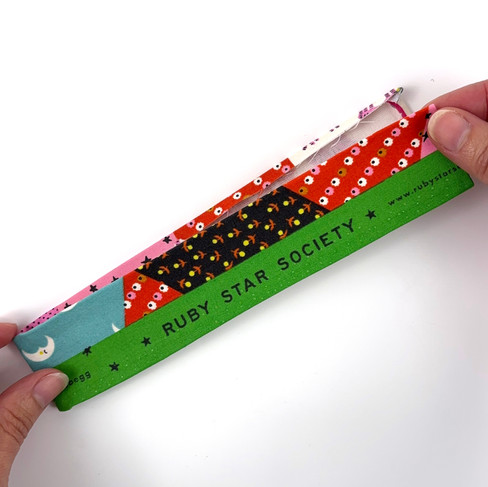


Here is a comparison of the "Tube-Turn" vs. "Fold & Press" Method. You may have great results with the "Tube-Turn" Method. It was simply easier for me to get nice sharp lines with the "Fold & Press" Method. Top bracelet is made by "Tube-Turn" and bottom bracelet is made by "Fold & Press".


Now for some glamour shots to get you motivated...


Don't forget to share your makes on social media!
I would love to see and share them.
Use the hashtag #selvedgebracelet and tag me @banjoflannel
Thank you for reading this post. For all the Banjoflannel news scroll down and subscribe to the Knot-Rollers Newsletter!