Eclipse Project Case Sew Along: Week 3 - Prepare Scrunchie Closure and Shell
- Banjoflannel

- Apr 20
- 4 min read
Updated: May 8

Thank you for joining the FIRST Sew Along celebrating my new book, "Patchwork Sashiko: Transform Your Scraps". This Eclipse Project Case is a simple make that let's your Patchwork Sashiko textile shine right on the front. And it's useful! Inside you can store all the tools you need for your Patchwork Sashiko practice: thread, needles, silicone needle pullers, marking pens/pencils, snips and a small ruler.
So far, we've sewn all the internal pieces of the case to the Lining; the felt needle minder, zippered pocket and open pocket.
One piece we did not prepare in Week 1 is the Decorative Circle so that you would have time to prepare your 7'' x 7'' Patchwork Sashiko textile. If you don't have a textile to work with, that's okay! Cut a 7'' x 7'' piece of your chosen fabric + a 7'' x 7'' piece of Pellon SF101. Fuse the SF101 to the WS of the fabric and you're set to go!
The goal for this week is to add our Scrunchie Closure and attach the Decorative Circle to the Shell. You'll love the ingenious way we create the scrunchie thanks to a great video tutorial from Seamwork.

✨Share your progress on social media! #eclipseprojectcase✨
Add Scrunchie Closure
Note: I cannot take credit for this amazing way to make a scrunchie. Seamwork has a great video tutorial that is not exactly the size we are making, but you can clearly see the process. I encourage you click the button below and watch the video before starting this section.


1. Sew together the short ends of the 2 1/2'' x 29'' Scrunchie Closure piece, RST. Press seam open.


2. Lay the loop flat in front of you so that it is doubled up, RST, seam side on the bottom.
3. Take the top layer and fold in thirds towards the center so that the raw edges of the bottom layer are exposed.
4. Fold the bottom layer in half RST making sure seam is aligned with itself.


5. Start sewing this edge 1’’ past the seam and stop sewing 1’’ before the seam (pins in the photo indicate these 1'' points. Don't sew with the pins inserted.). As you run out of room, stop with the needle down, pull more of the internal fabric through to the front and continue sewing. Make sure you are always sewing through only the outer 2 layers! The internal folded fabric needs to stay free.


6. Turn the loop RS out through the gap.


7. Insert 9'' piece of elastic through one end and out the other. I use a safety pin and scooch it through. Safety pin the other side to the scrunchie as well to keep it from disappearing inside! The 2 elastic ends should be sticking out of the 2 scrunchie ends, respectively.


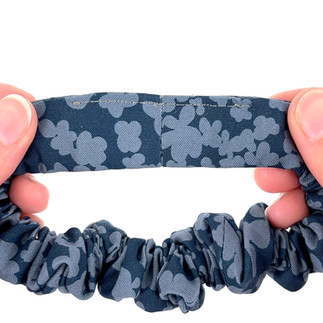
8. Overlap the ends by ¼’’ and sew back and forth to secure. I pin the ends together just long enough to drop the needle into place before sewing. (This may not be pretty, it just needs to be secure. Give it a good tug to make sure it doesn’t separate.)
9. Press the raw edges of the gap inward and sew closed.


10. Mark center of the Lining right edge by measuring or folding in half.
11. Fold the Scrunchie Closure in half at the seam and push folds away from the seam. Insert a pin 1’’ away from the fold to keep ruffles out of the way.


12. Position at the center mark facing inward. Extend the fold of the Scrunchie Closure beyond the Lining by ¼’’ so we’re not sewing through a lot of bulk, and pin.
13. Baste to the edge.
Add Decorative Circle to Shell
Note: I'm using a single layer of fabric in this tutorial sample to showcase The Salty Hippo's beautiful hand printed fabrics. If you're also using a single layer of fabric, fuse Pellon SF101 to the WS before cutting. Photos for both versions will be shown.


1. Place Decorative Circle Template on WS of Patchwork Sashiko textile or single layer of fabric, trace and cut out. Follow directions on template to ensure symmetry.


2. Fold Shell in half, long sides together to find the center line, then trace this line or finger press to crease.


3. Position Decorative Circle so that the center line (chosen when you traced the template; either a stitched line or the space between 2 stitched lines) matches up with the center line on the Shell. If not using a Patchwork Sashiko Textile, fold Decorative Circle in half and align this fold with Shell center line.
4. Adjust so that the Decorative Circle is centered at 1 3/4'' from the right and left edges of the Shell.


5. Pin and top stitch to the shell.
You did it! Only one week left and you'll have your own handmade project case.
Don't forget to share your progress on social media!
I would love to see and share them.
Use the hashtag #eclipseprojectcase and tag me @banjoflannel
Thank you for reading this post. For all the Banjoflannel news scroll down and subscribe to the Knot-Rollers Newsletter!
Comments